DHCP spoofer
A network attack tool for performing man-in-the-middle attacks using DHCP spoofing.
Network
Cybersecurity
Programming
Demo
what we will create?
We'll create a C++ tool that demonstrates a classic Man-in-the-Middle (MitM) attack by impersonating a DHCP server. We will break down how the code works, from crafting raw network packets to manipulating a victim's traffic. before we start there are some fundamental concepts we must understand.
DHCP
When a new device (a client) connects, it needs an IP address to communicate. The client shouts a "DHCP Discover" message to the entire network. A DHCP server hears this, offers an available IP address ("DHCP Offer"), the client requests it ("DHCP Request"), and the server confirms it ("DHCP Acknowledge"). This four-step process (DORA) happens automatically every time you connect to a Wi-Fi or Ethernet network.
ARP
Once a device has an IP address, it needs a way to find the physical hardware (MAC) address of other devices on the local network. ARP is the directory that maps IP addresses to MAC addresses. When your computer wants to send a packet to the router (e.g., 192.168.1.1), it sends an ARP request asking, "Who has 192.168.1.1?" The router replies with its MAC address.
How the attack work?
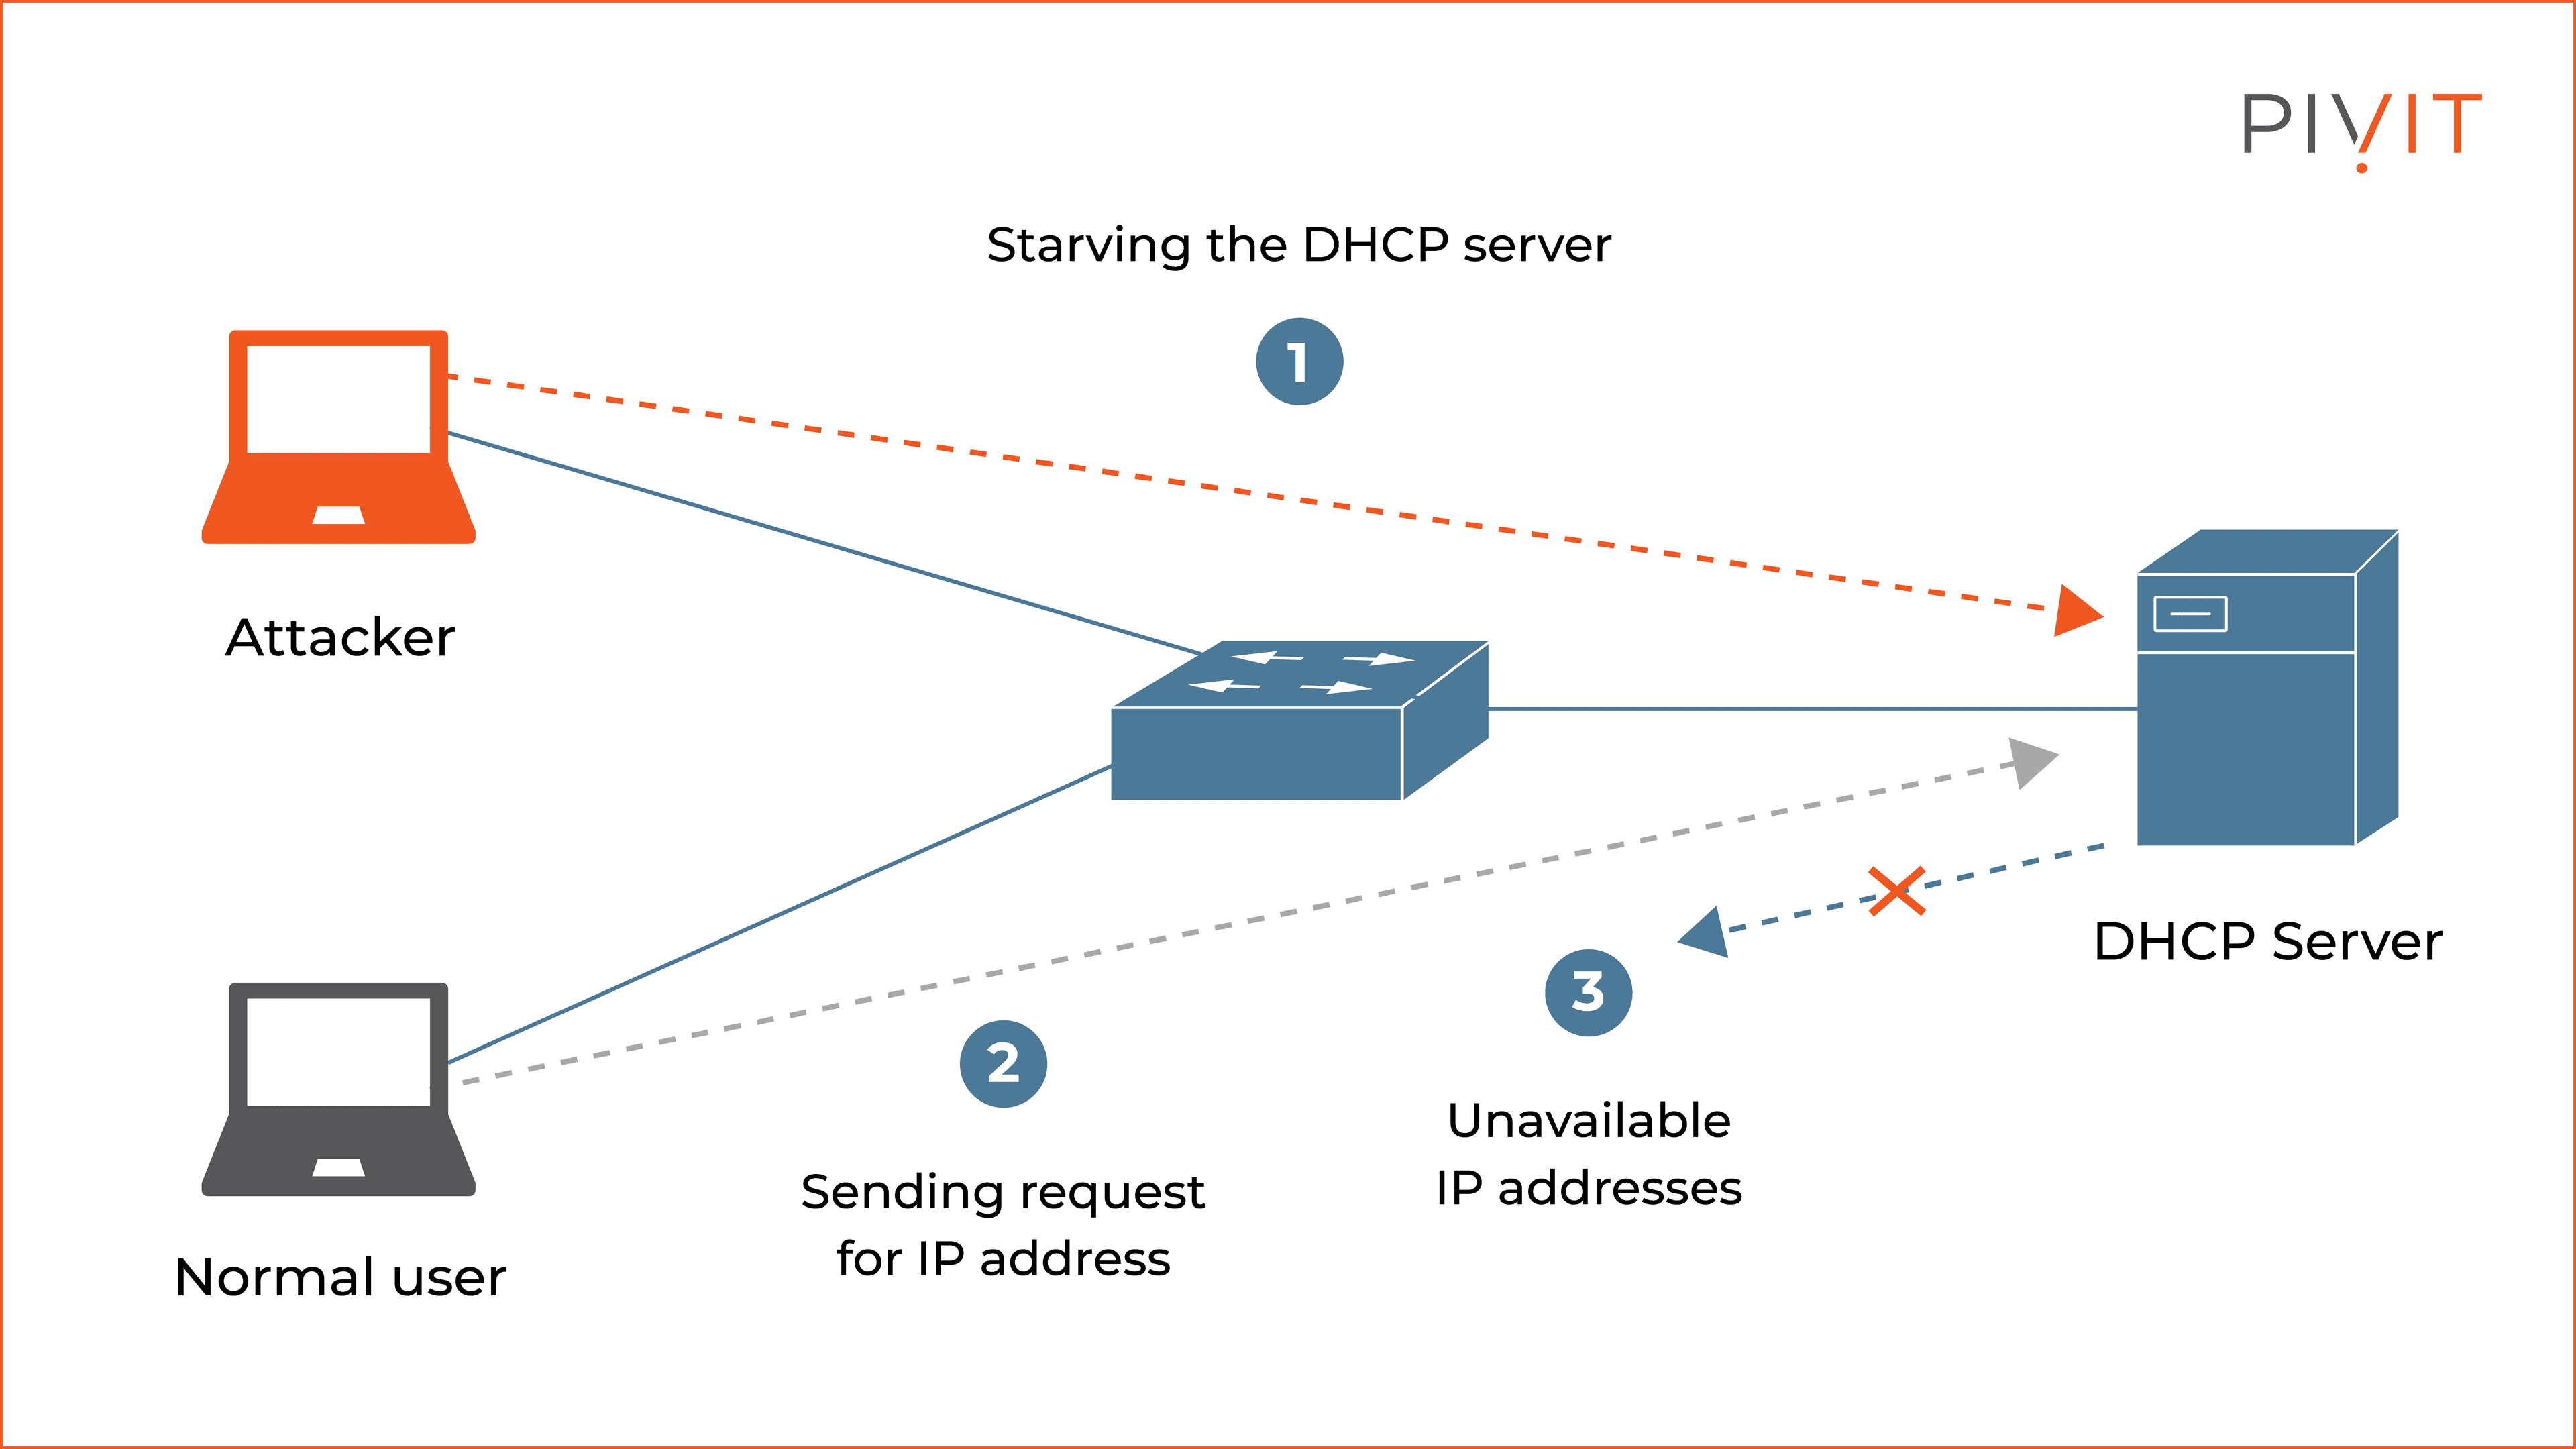
An attacker sets up a rogue DHCP server. when a client send DHCP Discover the attacker's server races to reply before the real server if the attacker is faster they can trick the client to accepting a malicious network configuration for example we can change the DNS server ip, or the default gateway, in our attack we will spoof the default gateway ip.
Code
Now, let's get our hands dirty and dive into the C++ source code. The tool is elegantly divided into two main classes, each with a distinct responsibility:
DHCPPacket: A low-level class designed to build and dissect DHCP packets, acting as our universal translator for the DHCP protocol.Poison: The high-level engine that orchestrates the attack, using theDHCPPacketclass to listen for victims and execute the spoofing logic.
Let's break down each one.
DHCPPacket class
This is the class design I came up with. I'll be the first to admit it's not perfect. It was one of those moments where, after you finish writing the code, you see a better way. I realized that the Builder design pattern would have been ideal for assembling and deconstructing DHCP packets. It's not a big deal for this project, but it's a great lesson in choosing the right pattern for the job.
before we start see the code we must understand DHCP headers and format. for more info click here.
"options" section. It's not a fixed header but a sequence of small, self-contained blocks of information. Each block follows a simple Type-Length-Value (TLV) format:
- Type: A single byte that identifies the option's purpose. For example, type
3is for the "Router" (gateway), and type6is for "DNS Servers." - Length: A single byte that specifies how long the following data is. For instance, since an IP address is 4 bytes, the length for the Router option would be
4. - Value: The actual data for the option, with a size matching the
Lengthfield. This is where the IP address, server name, or other configuration data is placed.
We'll start with the parse function. It takes a pointer to the buffer that holds the raw binary data of the packet and the length of that buffer.
- first we start with some checks if the len of the buffer less than 240 we will reject, barbecue the minimum is 240.
- Now, we just add the values from the buffer into our class variables according to their fixed offsets. For example, the
opcode is the very first byte (buffer[0]), and thexidis a 4-byte value starting at the 4th byte (buffer + 4). We do this for all the fixed fields likeciaddr,yiaddr, and the client's hardware addresschaddr. - Next, we check the magic cookie at offset 236. This is a special, constant value that must be present. If it's not there, we know this isn't a valid DHCP packet.
- Here is the most interesting part: the options section. As we discussed, every option must follow the
Type-Length-Valueformat. So, for example, if we want to read the Router IP, the data must be in this format:[code], [len], [data].The code loops through this section, which starts right after the magic cookie at offset 240. In each loop, it does the following:
This continues until it hits the special DHCP_OPT_END marker, which tells us we're done.
code
1
2
3bool DHCPPacket::parse(const uint8_t *buffer, size_t len) {
4  if (len < 240) {
5      LOG_ERROR("minimum length should be at least 240 bytes, but got %d bytes (%s)", len);
6      return false;
7  }
8  op = buffer[0];
9  htype = buffer[1];
10  hlen = buffer[2];
11  hops = buffer[3];
12
13  xid = *(uint32_t *)(buffer + 4);
14  secs = *(uint16_t *)(buffer + 8);
15  flags = *(uint16_t *)(buffer + 10);
16  ciaddr = *(uint32_t *)(buffer + 12);
17  yiaddr = *(uint32_t *)(buffer + 16);
18  giaddr = *(uint32_t *)(buffer + 20);
19  siaddr = *(uint32_t *)(buffer + 24);
20
21  memcpy(chaddr, buffer + 28, 16);
22
23  for (size_t i = 0; i < 64 && buffer[44 + i] != '\0'; i++) {
24    sname += (char)buffer[44 + i];
25  }
26  for (size_t i = 0; i < 128 && buffer[108 + i] != '\0'; ++i) {
27    file += (char)buffer[108 + i];
28  }
29  uint32_t magic = ntohl(*(uint32_t *)(buffer + 236));
30  if (magic != DHCP_MAGIC_COOKIE) {
31      LOG_ERROR("invalid DHCP magic cookie: got 0x%08x, expected 0x%08x", magic, DHCP_MAGIC_COOKIE);
32  }
33
34  const uint8_t *ptrOptions = buffer + 240;
35  size_t offset = 0;
36  while (ptrOptions[offset] != DHCP_OPT_END) {
37    uint8_t code = ptrOptions[offset];
38    if (code == DHCP_OPT_PAD) {
39      ++offset;
40      continue;
41    }
42    uint8_t optLen = ptrOptions[offset + 1];
43    options[code] =
44        vector<uint8_t>(ptrOptions + offset + 2,
45                        ptrOptions + offset + 2 + optLen); // start, end
46    offset += 2 + optLen;
47  }
48
49  return true;
50}
51
The build function does the exact opposite of parse. It takes all the structured data from our DHCPPacket class and writes it into a raw byte buffer so we can send it over the network.
First, we start with a check. If the buffer we're given is smaller than 575 bytes, we reject it. This is a safety measure to ensure we have enough space for a standard DHCP packet, including all possible options.
parser.cpp
1  if (len < 575) {
2      LOG_ERROR("Buffer too small for DHCP packet\n");
3    return 0;
4  }
5
Now, just like before, we write the values into the buffer at their correct offsets. We take the op code from our class and put it in the first byte (buffer[0]), the xid at the 4th byte, and so on. It's the reverse of what we did in parse.
parser.cpp
1  buffer[0] = op;
2  buffer[1] = htype;
3  // ...and so on...
4  *(uint32_t *)(buffer + 4) = xid;
5  // ...etc...
6
Next, we write the magic cookie at offset 236. We use htonl to make sure the number is in the correct network byte order before placing it in the buffer.
parser.cpp
1*(uint32_t *)(buffer + 236) = htonl(DHCP_MAGIC_COOKIE);
2
Here is the most interesting part again, but in reverse: building the options section. We loop through our options map, which contains all the options we want to add to the packet.For each option in the map, we write it in the Type-Length-Value format:
- First, we write the
code(the Type). - Then, we write the
val.size()(the Length). - Finally, we use
memcpyto copy theval.data()(the Value) right after the length.
We keep track of our position using the ptrOptions pointer, moving it forward after each option is written.
parser.cpp
1  // [type (1 Byte), length (1 Byte), data]
2  for (auto &[code, val] : options) {
3    // ... skip padding and end options ...
4    ptrOptions[0] = code; // Write the Type
5    ptrOptions[1] = val.size(); // Write the Length
6    memcpy(ptrOptions + 2, val.data(), val.size()); // Write the Value
7    ptrOptions += 2 + val.size(); // Move pointer to the next spot
8    totalLen += 2 + val.size();
9  }
10
To finish, we write the special DHCP_OPT_END byte (255) to signal that there are no more options. The function then returns the totalLen, so the part of the code that called build knows exactly how big the final packet is.
parser.cpp
1  *ptrOptions = DHCP_OPT_END;
2  totalLen += 1;
3  return totalLen;
4
To make building packets easier, I created many small "setter" functions that handle adding specific options to the options map for us. I've made these for almost all common DHCP option types, including ones that take a single value, a list (like a vector of DNS servers), or a string.Let's look at a simple example, the setRouter function. Its only job is to add the "Router" option (Type 3) to our packet.
parser.cpp
1uint8_t DHCPPacket::setRouter(const uint32_t &ip) {
2  // 1. Find or create the entry for the Router option in our map.
3  //    Then, resize its vector to 4 bytes, because an IP address is 4 bytes long.
4  options[DHCP_OPT_ROUTER].resize(4);
5
6  // 2. Copy the 4 bytes of the IP address directly into that vector.
7  memcpy(options[DHCP_OPT_ROUTER].data(), &ip, 4);
8
9  // 3. Return the option code, which is useful for confirmation.
10  return DHCP_OPT_ROUTER;
11}
12
it's that simple. First, we make sure the vector for the router option is the right size (4 bytes). Then, we use memcpy to copy the IP address into it.When the build function runs later, it will find this entry in the options map and automatically convert it to the Type-Length-Value format in the final byte buffer. This way, we can just call simple functions like setRouter(gateway_ip) and setSubnetMask(subnet) without worrying about the low-level byte ordering every single time.
Poison class
this class will handles listening for victims, crafting malicious replies, and redirecting traffic.
start() - Preparing for the Attack
function is where we set everything up. First, we create two special sockets: sockfd and relayfd. These are AF_PACKET raw sockets, which means we can read and write full Ethernet frames. This gives us complete control over the network packets. sockfd will be used to listen for DHCP packets from the victim and send our fake replies. and relayfd will be used to forward the victim's traffic to the real router after the attack is successful.
parser.cpp
1  sockfd = socket(AF_PACKET, SOCK_RAW, htons(ETH_P_ALL));
2  relayfd = socket(AF_PACKET, SOCK_RAW, htons(ETH_P_ALL));
3
Next, we do some necessary setup. We bind sockfd to our network interface (e.g., wlan0 or eth0) so it can capture all traffic. We also use ioctl to get our own MAC address, which we'll need later to identify ourselves. Finally, and most importantly, we launch two separate threads that run in the background:
poisoningThread: This thread runs the poisoning() function, which constantly listens for DHCP requests.relayTrafficThread: This thread runs the relayTraffic() function, which will handle intercepting and forwarding the victim's data
poisoning() - Listening for the Victim
This function runs in an infinite loop with one simple goal: to find DHCP packets from our target.It uses recvfrom to grab every packet it can from the socket. Then, it applies a series of filters:
- Is it an IP packet?
- Is it from our specific
targetMac? - Is it a UDP packet?
- Is it for the DHCP service (ports 67 or 68)?
If a packet passes all these checks, we know we've found a DHCP request from our victim. We then use our DHCPPacket::parse() function to read it, and finally pass it to handleClientRequest() to generate the malicious reply.
handleClientRequest() - Crafting the Malicious Reply
This is where the actual spoofing happens. This function looks at the type of DHCP message we received from the victim.
- If it's a
DHCP_DISCOVER, it means the victim is asking for an IP address. We call ouroffer()function to build a fakeDHCP_OFFER. This offer will contain the IP address we want to give the victim, and most importantly, it will list our own IP address as the router/gateway. - If it's a
DHCP_REQUEST, it means the victim has accepted an offer. We call ouracknowledge()function to build aDHCP_ACKpacket. This confirms the lease and solidifies our position as the man-in-the-middle.
After the DHCP part of the reply is built by offer() or acknowledge(), this function constructs the rest of the packet (the UDP, IP, and Ethernet headers) and sends it back to the victim.
relayTraffic() - The Man-in-the-Middle
Once the victim is compromised, their computer will start sending all its internet-bound traffic to our MAC address. The relayTraffic() function is responsible for handling this.
It runs in a loop, capturing every packet sent by the victim. For each packet, it does two things:
- Logs the packet: This is where we can inspect the victim's traffic. using pcap.
- Forwards the packet: It changes the packet's source MAC address to its own and the destination MAC address to the real router's MAC. Then it sends the packet on its way.
This forwarding is crucial. If we just captured the traffic and did nothing with it, the victim would lose their internet connection and know something was wrong. By silently forwarding the traffic, the attack remains invisible to the user.
Poison.cpp
1// Inside the relayTraffic while(true) loop...
2if (isFromClient) {
3  // Log the packet...
4  LOG_INFO("packet - From: %s->%s | IP: %s->%s...", ...);
5
6  // Forward it: Change destination to the real router
7  memcpy(eth->h_dest, cfg.routerMac, 6);
8  memcpy(eth->h_source, cfg.interfaceMac, 6); // Set source as us
9
10  // Send it out
11  sendto(relayfd, buffer, bytesReceived, 0, ...);
12}
13
What is the issue?
So, we've successfully tricked the client. When the client requested an IP, we gave it one and set our own IP as its default gateway. Now, whenever the client wants to send traffic to the internet (e.g., to google.com), it sends the packets to our machine. Our relayTraffic function intercepts these, logs them, and forwards them to the real router. This is the outbound traffic flow:
Client → Attacker → Router → Internet
So far, so good. We can see everything the client is sending.But what happens when the router sends a response back?
This is where the problem lies. Remember ARP? The router maintains its own ARP table, which is a list of IP addresses and the MAC addresses they map to. When the router gets a response from the internet meant for the client's IP (192.168.100.33 in our example), it needs to deliver it.
The router asks the network, "Who has 192.168.100.33?"Since we have only tricked the client, the client itself will respond to that ARP request with its own, real MAC address.
The router's ARP table will therefore correctly map the client's IP directly to the client's MAC address.As a result, the router sends the response packets directly to the client, completely bypassing our attacker machine.This is the inbound traffic flow:
Internet → Router → Client
This creates a half-duplex Man-in-the-Middle attack. We can see the questions, but not the answers. We can see the client's requests, but none of the data coming back from the internet.
How to Prevent DHCP Spoofing Attacks
Defending against these attacks involves hardening your network at the infrastructure level. The most powerful tool is DHCP Snooping, a feature on managed switches that lets you designate "trusted" ports for your real DHCP servers. The switch will then automatically block any fake DHCP offers coming from an attacker on an "untrusted" port.
This works perfectly with Dynamic ARP Inspection (DAI), which uses the trusted information from DHCP snooping to build a secure database of IP-to-MAC address bindings. If an attacker tries to poison the network with a fake ARP packet, DAI will see that it doesn't match the database and discard it, stopping the MitM attack cold. For simpler but effective protection, Port Security can lock a switch port to a specific MAC address, preventing an attacker from plugging their device into the network in the first place. Finally, for critical devices like servers, you can use static IP and ARP entries, which hardcode the network configuration and make the device immune to these spoofing tactics altogether.
What Can We Add More?
This tool is a fantastic starting point. Here are some features we could add to make it even more powerful:
- Full-Duplex MitM: Implement proper ARP poisoning against both the victim and the router to intercept traffic in both directions. This would involve sending continuous ARP replies to keep the caches poisoned.
- DNS Spoofing: Since we are already the Man-in-the-Middle, we can intercept DNS queries. When the victim asks for the IP of
mybank.com, we can reply with the IP of our own malicious server, leading to a phishing attack. - SSL Stripping,Multi-Victim Support,A Nicer Interface.
Published Oct 8, 2025